Showing posts with label Anything Goes. Show all posts

Tuesday, 15 February 2022

WWC335 - Heidi's Challenge: "Anything Goes " Celebrating the End!

I can't believe I've made my last card for our wonderful Watercooler Wednesday Challenge.  It feels like a lifetime since our first post on June 1st, 2014.  It's been a wonderful "ride" and the experience has been fabulous.  I'm proud to have been part of the journey and to have "met" so many new people along the way.

Of course my last card has to be a jaw-dropping, ridiculously involved fancy fold.  Going out with a "bang" is part of my DNA.  This particular fold is the brainchild of the very talented Sam of "Mixed Up Craft".  Called the "Double Accordion Display Card", it takes a lot of materials and patience but it is so very worth the time.  Check it out for yourselves at her post (directions, templates and a handy UTube video are all included).


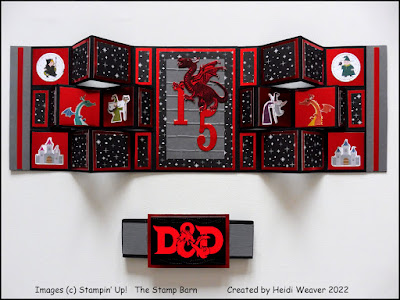
It's a big card!  Pushed absolutely flat, it measures an impressive 20" (nearly 51 cm) long and 6" (15.25 cm) tall.  It needs a belly-band to hold it closed.  Yes, it takes a lot of product.  I made it for my Grandson's 15th Birthday on February 16th (today) and tried to follow the Dungeons & Dragons theme that he loves.  


Since I used to be a Stampin' Up! Demo, I have a lot of the Company's patterned paper left over and, truly, it's high time that I begin to use it up or somehow get rid of it.  (I feel like a hoarder at times.)  Thankfully the Magical Day Suite has a lot of the characters I wanted for the card and so I fussy cut or die-cut several dragons, wizards, apprentices and castles to add to some of the many squares in this card.  I used a matte of the Red Foil first and then added the images or patterned paper.  Except for the images, I kept the colours to Basic Black, Basic Grey, and red.


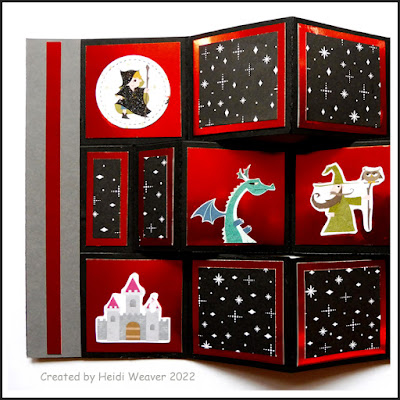
As you can see, both of the accordion ends of the card have an assortment of these images.


For the centre panel, I used a matte of the Red Foil and then the "magical" black and white patterned paper.  Then I added a piece of Basic Grey cardstock, embossed with a brick pattern.  My dragon image is by The Stamp Barn.  I heat embossed it in black on Red Foil and then fussy cut it out.  For the claws, horns and teeth, I added a layer of Nuvo White and for the eye, I used a drop of a glittery green Stickles.  I love the way it turned out, don't you?  Incredibly, it looks even better in person.  I adhered a die-cut one and five, staggering the numbers, and then adhered the dragon so that it appears to be on top of the numbers.


The back of the folded up card, held together with the belly-band.  I added a sentiment panel here, using a matte of Basic Grey and then the white cardstock upon which I stamped the birthday wishes.  I'll be adding his name and our own greeting, of course.


Finally, the finished, folded card with its belly band.   I love the front with its embossed brick and the classic colours of the rest of the card.  I found an image of the Dungeons and Dragons which he loves and printed it on Epson Glossy Photo paper.  After cutting it out with a fancy-stitch rectangular die, I mounted the image panel on a piece of Red Foil. It is the finishing touch to an extremely demanding creation.  I love it and hope you do, too. 


Have fun checking out our Watercooler Wednesday Challenge and I hope you'll link your creation before the deadline on Monday, February 28th, 2022.

I've also entered my card at the following challenges:

 Unicorn Challenge Blog #97 - Let's See Red

 AAA Birthday Card Challenges #34 - Patterns

Crafting Happiness Challenges #120 - Anything Goes

A Place to Start Challenge #202202 - Anything Goes


Wednesday, 15 December 2021

WWC331 - Marsha's Special 3-Week "Anything Goes" Challenge

It's that time of the year!  Christmas is looming every closer (and don't ask if I've managed to get all the gifts I planned on).  To give ourselves a bit of peace of mind, we're having a special 3-week challenge.  I have to admit to being very, very happy about that.

My card is a special swing fold.  The design really worked well to showcase two different stamp sets, one by Anita Jeram of the Colorado Craft Company and the other by the Ciao Bella Papercrafting company.  I think the images work together beautifully, don't you?

I used a piece of leftover patterned paper which retired some years back.  It makes a statement and yet doesn't take over from the images.   You can see in the close-up why they call it a swing fold since, as the card opens, the inner image swings away from the outer images and frame.  It results in a wonderful 3-D effect. 


After watercolouring the images, I added some Dazzling Details to the snow, adding texture and a whole lot of dazzle (the don't call it Dazzling Details for nothing!)   I decided to heat emboss the sentiment in copper since that is the metallic highlighted on the patterned paper.  I love the result, don't you?

The great thing about this card is that it can easily stand on its own, creating a terrific little winter scene.


Have fun checking out our Watercooler Wednesday Challenge and I hope you'll link your creation before the deadline on Monday, January 3rd, 2022.

I've also entered my card at the following challenges:

Lemon Shortbread Challenge #160 - Anything Goes

The Holly and Ivy Christmas Challenge #106 - Anything Christmas Goes

Dream Valley Challenges #260 - Christmas

Simon Says Monday Challenge - Cold as Ice

Wednesday, 3 February 2021

WWC307 - Heidi's Challenge: Anything Goes With a Feminine Twist

 After getting an amazing sentiment stamp made by Stampendous, I began checking my (way too many) stamps to see what image would fit.  Sometimes oldies are the best.  I combined two of my favourite Stampin' Up! sets and did some free-style drawing to wind up with a card that I love.  I hope you love it, too.  


I love this image from the Beautiful You set.  It is definitely my favourite, although I love the other images, too.  In order to make the image fit the sentiment, I added a puddle at her feet and then sketched two boots to fit her feet.  Since this is a very stylish girl, I had to ensure that her hat matched those boots, right?  And then I sketched in a little jacket since the rain is seldom warm.  All the colours I used to watercolour my image are from Stampin' Up!  We have Daffodil Delight for her hat, crinoline and boots, then her jacket is a combination of Basic Black and Smoky Slate.   That pretty dress is the lovely, bright Poppy Parade, the puddle and raindrops are Balmy Blue and then the sentiment is Pacific Point.


I'm not sure if you can tell from this angle that I covered the puddle with some Shimmering Crystal Effects.  After all, puddles are shiny, aren't they, even in the rain.  The raindrops are from the Weather Together stamp set.


For the inside, I cut a broad stitched frame from a piece of Balmy Blue cardstock and then stamped the remainder of the sentiment inside.  Then I went on a hunt for a boot stamp.  Believe me, with all the stamps I've accumulated, I knew I had a stamp which would be perfect.  And I was right.  This image is from the Craft Consortium Farm Meadow.  I love the style and went wild with the colours, of course adding polka dots to make them perfect. 


Have fun checking out our Watercooler Wednesday Challenge and I hope you'll link your creation before the deadline on Monday, February 8th, 2021.

I've also entered my card in the following challenges:

Lemon Shortbread Challenge #138 - Anything Goes

Addicted to CAS Challenge #190 - Pattern


Wednesday, 16 December 2020

WWC302 - Marsha's Special 3-Week "Anything Goes" Challenge

Oh my!  This is the final Watercooler Wednesday challenge for this year.  Just when I was thinking this year would last forever, it's almost over. Unlike the others, however, this challenge will last for 3 weeks, giving  us a bit of a break before we begin again in 2021.

I decided not to make a Christmas card for this challenge since, after all, it lasts well past that holiday.  Just for fun I played with an upbeat, purely fun honeybee set which I've had waiting at the side of my desk.  With the matching dies saving me time from some fussy-cutting, this was a pure pleasure to create.


I began with a base of the Heavy Whisper White, added a matte of Basic Black cardstock and then proceeded with the creation of the honeybees.  I stamped all five at once, spacing them so that using the dies all at once would not be a hardship.  Once I had them all cut out, I proceeded to watercolour them using my Derwent pencils and Aqua Painter.  I love the vivid yellows and reds, don't you?  To add a special sparkle, I added some Nuvo Glitter Gloss Aqua Shimmer.  

For the background, I took a piece of the Craft Consortium Light Tones Grunge paper.  Then I used my Tim Holtz stencil to add some hexagonal colours to the edges.  The deep yellow, purple and aqua shapes look great against the softer similar shades underneath, don't they?  Before placing my bees, I stamped the sentiment in the centre.  I love the way this turned out.  It makes me smile and look forward to "flying" into the new year.


 Have fun checking out our Watercooler Wednesday Challenge and I hope you'll link your creation before the deadline on Monday, January 4th, 2021.

I've also entered my card in the following challenges:

Lemon Shortbread Challenge #135 - Anything Goes

Crafty Creations Challenge #416 - Anything Goes

Creative Moments Challenge #204 - Anything Goes

The Paper Funday Challenges #24 - Anything Goes

Wednesday, 15 April 2020

WWC267 - Karen's Challenge: Anything Goes With a Masculine Twist

Something I am hearing about almost every day since the snow is shrinking back and the temperatures are getting milder is fly fishing.  Yes, my hubby is nuts about tying flies and going fishing.  So when I was trying to decide what I should do for our new Masculine Challenge, it was a no-brainer that I would haul out Stampin' Up!'s Best Catch stamp set as well as an old, retired favourite, In the Meadow.


I decided to keep it clean and simple.  My base is the Heavy Whisper White cardstock and then a matte of Gray Granite.  On another piece of Whisper White I stamped the mountain range from the In the Meadow set in the top third and then stamped the fisherman from the Best Catch set in the lower area.  To the right of the fisherman, I stamped the sentiment which is from a lovely fishing stamp set by Inky Antics.

I used watercolours for this card.  Several greens and then the Gray Granite ink colour the mountains and then a light wash of Balmy Blue defines the sky.  I also added a light wash of Coastal Cabana for the lake.

It's simple but I know that the fisherman in my life will love it and I hope you do, too.    Have fun checking out our Watercooler Wednesday Challenge and I hope you'll link your creation before the deadline on April 20th.


I've also entered my card in the following challenges:

Always Fun Challenges #158 - Clean and simple

Lemon Shortbread Challenge #117 - Anything Goes


Wednesday, 5 February 2020

WWC257 - Heidi's Challenge: Anything Goes With a Feminine Twist

Yay, it's my turn as a host for our Watercooler Wednesday Challenge!  This week it's Anything Goes With a Feminine Twist.  Such fun!  With Valentine's Day looming closer and closer, guess what type of card I've made this week.


I've used a base of Heavy Whisper White cardstock for this card.  Then I added a layer of gorgeous (retired) Lovely Lipstick Foil followed by another layer of Whisper White cardstock.  That finaly layer of white, however, went through some heavy changes before becoming part of the card.  For that stunning heart, I used one of the Gina Marie dies.  I love that the flower cuts at the same time as all those intersecting lines and only the petals can be curled up to bring more attention to it.


Of course I not only curled up those petals, but also covered them with a layer of the sparkly Wink of Stella.  For the centre of the flower, I added a retired Dahlia embellishment to which I added a few spots of silver with my Silver Liquid Pearls.


I used a sentiment from the Altenew Dotted Blooms set and heat embossed it with Silver Embossing Powder.  The arrow is from another Gina Marie die set and is cut from the Lovely Lipstick foil.


As a finishing touch, I used another Gina Marie die: the "Love" in that beautiful script.  I think it's perfect cut out of the Silver foil to balance the Silver embossing, don't you?


I love the way these colours work together and also how perfectly the dies came together as well.  I hope you do, too.

We also have some awesome samples by the other Watercooler Artists for you to check out over at our Watercooler Wednesday Challenge.

I've linked this card up to the following challenges:

Shopping Our Stash Weekly Challenge #413 - My Heart is on Fire

Crafting Happiness Challenge #34 - Anything Goes Twist Heart

Make My Monday Challenge #115 - I Heart You

Double D Challenges: Hearts Challenge

Wednesday, 18 December 2019

WWC252 - Marsha's Special 3-Week "Anything Goes" Challenge

It's almost Christmas!  As a special gift to ourselves, we're taking a bit of time off and so have made this challenge a special 3-week challenge.  As a result, I've created a "twofer" for this challenge.  What's a twofer?  Well, you take a stamp set or dies and create complimentary projects.  Et voila!  A twofer.


My gorgeous daughter was a competitive figure-skater until she graduated from High School.  With that in mind and combining Stampin' Up!'s Free Skate bundle with one of the images from the Born to Shine stamp set, I set about creating this card and gift tag.

I began by sponging over my Silver Foil with Pacific Point ink.  Being foil, it did not saturate the paper, but after drying overnight and then rubbing the excess ink off with a soft cloth, I could see the soft blue colouring which reminded me of the ice on which my daughter skated.

I stamped the image of the dancer and added skates to her feet with my Journalling Pen.  Then I carefully fussy cut the adjusted image before colouring it using my Stampin' Blends.


For the holly garland, I used the die in the bundle, cutting it twice from Call Me Clover cardstock.  Then I proceeded to add a bit of Call Me Clover ink to the holly leaves using my Stampin' Blends, before crumpling it into a tight ball and then carefully pulling it into a long garland again.  I added the garland, one on top of the other, diagonally across the foil and then added berries with dots of Red Liquid Pearls.


I love the way my lovely skater appears to be doing some fancy ice work on her toe-picks, don't you?  I decided to have the skate from the bundle set diagonally across from my skater.  The detailing on the image is so beautiful.  For a person who was immersed in the sport for years and wound up cleaning and polishing skates thousands of times, it brings back some wonderful memories.


I love that the sentiments in this bundle lend themselves so perfectly to the card which I created.  The inside is simple but reflects the front.

For my tag I decided to use the fancy die version of the skate.  After cutting it out from a piece of Whisper White, I placed it over a matte of Lovely Lipstick.  This cherry red is repeated both in the tag and in the card.  I've also used the Call Me Clover for the holly image which I stamped, coloured and cut with the corresponding die.


I laced the skate using the retired Candy Lane Baker's twine.  I love the thin red foil running through the white cotton, don't you?  Finally, since I simply couldn't find a sentiment which appealed, I decided to write it myself using a Signo Pigment Ink white pen.  A perfect complement to the card, don't you agree?


I hope you'll check out the wonderful creations by the Watercooler Artists over at our Watercooler Wednesday Challenge.

I've entered my card into the following challenges: 


Lemon Shortbread Challenge #109 - Anything Goes

Jingle Belles:  Taking Back Our 9th Christmas

The Card Concept #HOL19 - Favourite card  (I chose this one because it brings back memories of        my daughter skating in competitions.)

Wednesday, 4 December 2019

WWC250 - Helen's Feminine "Anything Goes" Challenge

I love the wonderful images which Bonnie Krebs draws for Art Impressions.  I own enough stamps sets with her images that choosing one for a card becomes increasingly difficult.  This set, however, the Woodland Holiday, reflects the season and allows me to use one of my favourite woodland animals, the fox.  Of course I haven't been delighted with the sight of a fox quite like this during my hikes, but one can hope, right?


For my base I used the Heavy Whisper White.  Then I added a matte of Highland Heather and, of course, the stamped piece.  I kept it clean and simple by stamping the image and sentiment and adding watercolours.  The only embellishment is a bit of Shimmery Crystal Effects gloss over the holly berries and silver bell.  I love the results and hope you do, too.


I hope you'll check out the wonderful creations by the Watercooler Artists over at our Watercooler Wednesday Challenge.

I've entered my card into the following challenges: 


Lemon Shortbread Challenge #108 - Anything Goes

The Holly and Ivy Christmas Challenge #61 - Anything Christmas Goes


Wednesday, 20 November 2019

WWC248 - Kath's Masculine "Anything Goes" Challenge

I had a whole bunch of half-thought out ideas of masculine cards I could create but somehow nothing really caught my interest.  Then I came across a stamp set which I picked up quite a while ago and put aside.  It's funny!  It's cute!  To my mind it was the perfect choice for this week's challenge.  I hope you like it, too.


The set comes as one stamp with this trio of laughing animals and, of course, a nice selection of sentiments from which to choose.  There is something about these three that tickles my "funny bone".  I had fun colouring them with my Stampin' Blends, too.  For the background, I just "scribbled" around the animals using the Light So Saffron.  The ground is coloured using the Light Gray Granite.  The zebra is coloured with the Basic Black and Light Flirty Flamingo.  The giraffe also has some Light Flirty Flamingo and then the body is Light Crumb Cake covered over with Light Pumpkin Pie.  Finally, the elephant is coloured using the Smoky Slate with touches of Flirty Flamingo.

I used a base of So Saffron, a matte of Gray Granite and then stamped on Whisper White.  It's a light-hearted card.  I love it and hope you do, too.


I hope you'll check out the wonderful creations by the Watercooler Artists over at our Watercooler Wednesday Challenge.

I've entered my card into the following challenges:


Arty Divas Challenge #9 - Anything Goes

Crafty Creations Challenge #402 - Anything Goes

Lemon Shortbread Challenge #107 - Anything Goes


Wednesday, 30 October 2019

WWC245 - Anything Goes Challenge

Oh my goodness!  It's time for one of our awesome "Anything Goes" Challenges.  Just for fun I decided to used the sweet Magnolia Blooms stamp set for a fancy fold.  The Magnolia Blooms set is the "baby sister" to the much larger Good Morning Magnolia stamp set.  It doesn't come with a die set but for my purposes, it's gorgeous (and much, much more reasonably priced).


I used the Heavy Whisper White for my base, added a layer of Highland Heather and another of Purple Posy.  Then I took a piece of Whisper White and embossed the centre using the gorgeous oval from the Heirloom Frames 3D embossing folders set.  I love the depth of embossing as well as the dainty "engraving" that covers the oval.  Finally, I cut a piece of Purple Posy cardstock using my oval stitched die.  On that, I stamped the large magnolia image from the Magnolia Blooms set, using the Gray Granite ink.

I coloured the leaves and the outer portion of the petals with the White Stampin' Chalk Marker.  Once the leaves dried, I coloured them using my Mossy Meadow Stampin' Marker.  For the petals, I added another two layers of the Chalk Marker to achieve as solid white a colour as possible.  Leaving the inner portion of the petals the original colour of the Purple Posy cardstock worked out well for this image.  Finally, for the centre of the flower, I used my gold Nuvo Crystal Drops.


For the inside of the card I cut a piece of Purple Posy cardstock using a stitched rectangle die.  Then I added an outline of the Stitched Nested Labels dies in Mossy Meadow cardstock.  Finally I added a Whisper White stitched rectangle with the sentiment stamped using Purple Posy ink.


I love how beautifully the easel card stands, don't you?


I hope you'll check out the wonderful creations by the Watercooler Artists over at our Watercooler Wednesday Challenge.

I've entered my card into the following challenges:


Lemon Shortbread Challenge #105 - Anything Goes

Get Creative Challenges #85 - Anything Goes

Lil Patch of Crafty Friends Challenge #116 - Anything Goes

Wednesday, 16 October 2019

WWC243 - Heidi's Masculine "Anything Goes" Challenge

Masculine challenges can be such fun.  I have some birthday "boys" coming up for whom I always make outdoorsy cards.  This is where the "Let it Ride" stamp set comes in handy.  Strangely enough, I also used the gorgeous Pressed Petals Designer Series paper and the Stitched Nested Labels dies added some dramatic detail.


Isn't that a fun card?  I used a base of Heavy Very Vanilla for a change.  It really complimented the layer of Soft Suede and the lovely piece of Designer Paper.  That burlap pattern is one of the "back" sides of the Pressed Petals DSP, and is perfect for the masculine feel I for which I was striving.  Instead of adding the stamped layers to the top, I actually cut out a "window" using the medium sized Stitched Label die, to expose the Soft Suede underneath.  Then I used a much smaller Stitched Label die to cut out a piece of Very Vanilla and stamped the horses onto that.  By mounting the stamped piece to the left, I had sufficient room to stamp the trees from the set onto the Soft Suede.

At the bottom of the card you can see I cut only portions of a piece of Soft Suede and a piece of Very Vanilla using the Stitched Label dies.  After stamping the "Happy Birthday" using Old Olive, I mounted the Very Vanilla to the far right of the die-cut Soft Suede before attaching the whole to the bottom of the card.  I think it balances the card nicely.  The horseshoes?  There's a story.  Remember the Home Sweet Home thinlit dies?  Well one of those dies is a round-topped window so I used that to cut two scraps of the retired Galvanized Metallic paper and then, after cutting off the window cross-pieces and bottom, I had horseshoes.  A few nail-holes added with my black pen finished the job.


For the inside I added two die-cuts of that great burlap paper and then added a special fold as a surprise.  It's an easy fun fold but will give added pleasure to the receiver of this card.  The remaining images and sentiments from the Let it Ride set fit onto the squares perfectly and look great, don't they?


I hope you'll check out the wonderful creations by the Watercooler Artists over at our Watercooler Wednesday Challenge.

I've entered my card into the following challenges:


2 Crafty Critter Crazies Challenge #31 - Anything Goes with a Critter

Crafty Animals Challenge #31 - Anything Goes

Crafty Creations Challenge #400 - Anything Goes

The Card Concept Challenge #121 - Adventure Awaits (I was inspired by a combination of the colours and the textures in the inspiration photo.  When I think of horses, I always think of adventures).

Wednesday, 2 October 2019

WWC241 - Dawn's Feminine "Anything Goes" Challenge

Ooooh!  It's a feminine challenge at the Watercooler this week and Dawn is our host.  I decided to combine that awesome Pressed Petals Specialty Designer Series paper with the terrific Wonderful Moments stamp set.


Doesn't that combination look wonderful?  I used a base of Heavy Whisper White and, after fussy cutting carefully around the inside of the floral wreath image on that pretty wood-grain paper, I was ready for the image which would be featured inside the wreath. 

I took a piece of Whisper White cardstock and, after using my Basic Black Stampin' Marker to ink up everything but the bouquet and ribbon at the back of the dress, I stamped the "bride".  My intention was to simplify the dress and also to have her hold some balloons rather than the bouquet.  I used my Stampin' Blends to colour the image.  The dress is Rococo Rose while the hair is a combination of Crumb Cake and Daffodil Delight.  Her skin is Ivory and the balloons are Daffodil Delight and, again, Rococo Rose.  Then I covered the image and stamped the dots from the stamp set (confetti?) as my background. 

I love the way she fits into the cut out of the wreath, don't you?  And the banner finishes off my card perfectly.


I hope you'll check out the wonderful creations by the Watercooler Artists over at our Watercooler Wednesday Challenge.

I've entered my card into the following challenges:


Lemon Shortbread Challenge #103 - Anything Goes

{PIN}spirational Challenges #248 - Photo Inspiration


Wednesday, 18 September 2019

WWC239 - Helen's Masculine "Anything Goes" Challenge

I had so many ideas for this masculine challenge!  Finally I decided to use that wonderful "A Good Man" stamp set for my card.  With some masking and several other stamp sets, I created a scene that I'm sure would work for a birthday or some other celebration.


I combined the "A Good Man" set with the "Waterfront" set as well as the retired "Carols of Christmas" set.  I used a lot of inks for my watercolouring.  The background combines the Balmy Blue, Smoky Slate, Pear Pizzaz, Old Olive, Crushed Curry, Crumb Cake and Gray Granite inks.  The trees are stamped using Mossy Meadow while the deer is Black.  For the people I've used primarily Stampin' Markers in Cajun Craze, Balmy Blue, Soft Suede, Crushed Curry, Poppy Parade and the retired Blush Blossom.

My base is the Heavy Whisper White while the matte is Gray Granite.  I love how this turned out, don't you?

I hope you'll check out the wonderful creations by the Watercooler Artists over at our Watercooler Wednesday Challenge.

I've entered my card into the following challenges:

Lemon Shortbread Challenge #102 - Anything Goes

Cute N Crafty Challenge #31 - Family

Creative Craft Cottage Challenge #122 - For the Men in your life

Wednesday, 4 September 2019

WWC237 - Michelle's Feminine "Anything Goes" Challenge

Yay!  Michelle is hosting our awesome Feminine "Anything Goes" Challenge and I am finally going to put ink to the adorable octopus image from the Sea of Textures bundle.  Over the months I've reached for it many times, but each time found myself doing something completely different.  This time the gorgeous Perennial Essence Designer Series Paper inspired me to use the octopus.


Look at the wonderful colours in the background.  Isn't it just perfect as an undersea cavern?  Of course my octopus is sporting rather unique colours since I stamped the image using Melon Mambo and then coloured the white portion of the underneath using my Flirty Flamingo Stampin' Blends.  Who knew those colours would compliment each other so well?  And don't you just love those sparkling black rhinestone eyes?

I used a base of Heavy Whisper White and then added a layer of the Highland Heather cardstock before adding the Perennial Essence DSP.  The netting in the background is cut from the retired Galvanized Metal foil using the matching Under the Sea dies.


In this close-up you can see those sparkling eyes so much better.  I love all the colours and I believe Madame Octopus is quite pleased with the ones I chose for her.

I hope you'll check out the wonderful creations by the Watercooler Artists over at our Watercooler Wednesday Challenge.

I've entered my card into the following challenges:


Lemon Shortbread Challenge #101 - Anything Goes

Get Creative Challenges #84 - Anything Goes


Wednesday, 31 July 2019

WWC232 - "Anything Goes" Challenge

Hurrah!  July has a 5th Wednesday and so we get to have one of our amazing "Anything Goes" Challenges this week.  I have finally received the Heirloom Frames Dies & 3D Embossing Folders which had been on backorder for a while.  Of course I had to use them and, for this challenge, decided to go all out and open a new package of Designer Series paper as well, the Mosaic Mood Specialty DSP.  The finished result turned out amazingly well, don't you agree?


I began with a base of Heavy Whisper White.  Then I added a narrow layer of Balmy Blue cardstock, a wider layer of Whisper White and then a layer of a very subtle pattern from the Woven Threads Designer Series paper.  In order to get a very sharp impression on the Balmy Blue oval, I sprayed the piece with water, getting it quite wet, before putting it through the Big Shot.  Once it dried, the pattern turned out sharp and crisp, almost like a carving.  I love the results.

After using Dimensionals to lift up the oval on the card, I added two more ovals, centered on the embossed oval, one stitched oval in Whisper White and the other a plain oval in the same paper as the Woven Threads DSP.

After choosing which humming bird I would fussy-cut from the gorgeous Mosaic Mood Specialty DSP, I quickly got that done and mounted him onto the card with Dimensionals as well.  For my flower I thought the pretty Altenew Dotted Blooms images were perfect and, after stamping one using the Terracotta Tile ink, cut that out and then finished colouring it using my Grapefruit Grove Stampin' Marker.  I love the colours that I created, mixing the stamped ink and the ink from the marker, don't you?  With a Gold Faceted Gem in the centre, the flower was complete and ready to be added with Dimensionals.

I decided to stamp the sentiment on a scrap of Whisper White using the Balmy Blue ink.  The "Thank You" is nice and large and I love the script from the versatile Love What You Do stamp set.  After quickly cutting that out, I added it to the card, also on Dimensionals.  What do you think?  It turned out great, didn't it?


I hope you'll check out the wonderful creations by the Watercooler Artists over at our Watercooler Wednesday Challenge.

And then I decided to play with the Magnolia Lane Memories & More Project Pack.  There are several sheets of printed vellum in the pack, one of which had the perfect sized Magnolia printed on it.  Of course my curiosity was piqued and I had to see how that might work with this card.  The only problem was, well, vellum!  I love the stuff but it does change the look of things when one can see through the flower.  Well, they say that a lot of things can be resolved during one's sleep.  It sure worked in this case.  I woke up with a complete resolution in line.  First I cut out the vellum Magnolia image which most appealed to me.  Then I covered the back of the vellum piece COMPLETELY with VersaMark.  Once that was done, I covered the VersaMark with White Embossing Powder, heated it up to melt it, and the result was absolutely perfect.

After using the Mango Melody and Terracotta Tile inks to colour the front of the image and adding a Gold Faceted Gem to the centre, I changed out the flower on the card and love the results.  Either flower works perfectly, but I'm glad I tried the vellum as well.


I've entered my card into the following challenges:

Lemon Shortbread Challenge #99 - Anything Goes

Dragonfly Dreams Challenge - Things With Wings

Crafting By Design - August Anything Goes

Creative Moments Challenge #173 - Anything Goes